Hello, it’s Tony from the Backend Team of the Japan Office. With the recent rise in popularity of ChatGPT, I decided to explore and implement an interesting use case: a phone conversation with an AI bot.
As AI is taking over the world, call centers will probably be one of the sectors that may be impacted and where humans could be replaced by AI bots (at least, for simple inquiries).
In this article, we will be implementing a prototype of such an application. The technology stack is as follows:
- NodeJS API & Websocket server
- Twilio API (via the official SDK)
- OpenAI API (via the official SDK)
- AmiVoice websocket API
Twilio will be used as our entrypoint for receiving phone calls. We will provision a phone number for Twilio platform and connect it to our NodeJS server on incoming calls.
Then, a voice recognition service (for Japanese language only) called AmiVoice will be used for transcribing the caller voice stream into text by the means of websocket API.
OpenAI API will be used for sending requests with the transcribed texts and getting back the responses. The responses will be relayed back verbally to the caller via Twilio’s internal text-to-speech features.
Architecture
The architecture is quite straight-forward and easy to understand.
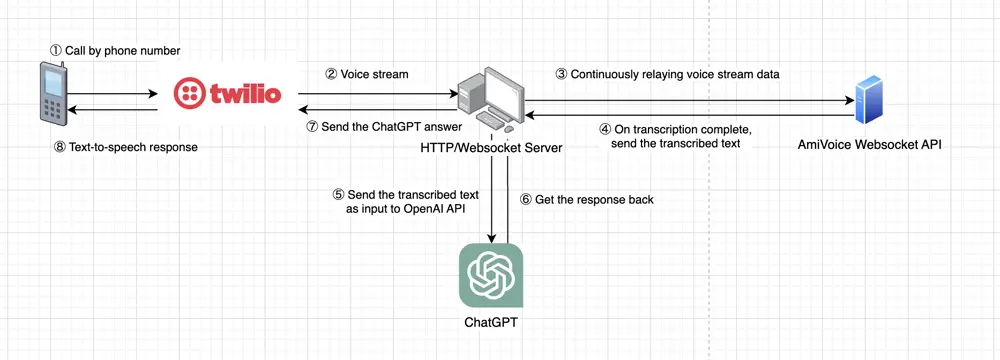
- The caller calls the phone number.
- Upon receiving the call, Twilio will start a stream and continously provide voice data.
- That data will be relayed to AmiVoice for speech-to-text analysis.
- Transcribed texts are received from AmiVoice when a transcription is complete. AmiVoice also takes care of detecting pauses in speech so it will return transcribed texts of complete sentences.
- The text data is provided to ChatGPT.
- ChatGPT returns a response.
- That response is relayed to Twilio.
- The response (originally in text format) will be spoken via Twilio’s text-to-speech feature to the caller.
Implementation
⚠️ Please note that I didn't include all the code as I want to focus on the main parts of the implementation. The full code can be found here: https://github.com/tonystrawberry/callbot.twilio.amivoice.
Setting ngrok for local testing
Our NodeJS HTTP/websocket server will need to be accessed from the internet. In order to achieve that, let’s setup ngrok and get our ngrok domain.
-
Install ngrok on your machine. Installation instructions can be found on the official website.
-
We will be using port 3000. Run the command below to provide a tunnel for the internet to access our local server.
ngrok http 3000 -
It will display your ngrok domain. In my case below, it is
https://df2b-39-110-216-51.ngrok-free.app. Please note that everytime your restart ngrok (on the free version), your domain will change and you will need to reconfigure the Twilio settings accordingly.
;
const HttpDispatcher = require("httpdispatcher");
const dispatcher = new HttpDispatcher();
const httpServer = Http.createServer(handleRequest);
const HTTP_SERVER_PORT = 3000;
/* POST /twiml */
/* This endpoint is called when the call is first connected */
/* This endpoint needs to be set on Twilio as the Voice Request URL */
/* Reference: https://www.twilio.com/docs/voice/tutorials/how-to-respond-to-incoming-phone-calls/node */
dispatcher.onPost("/twiml", (_request, response) => {
const twilioVoiceResponse = new VoiceResponse();
/* Setup the media stream from Twilio to our own websocket */
twilioVoiceResponse.start().stream({
url: `wss://${env.NGROK_DOMAIN}`,
});
/* Say the first message to the caller */
twilioVoiceResponse.say(
{
voice: "Polly.Takumi-Neural",
language: "ja-JP",
},
"こんにちは。匠です。何でも聞いてください。"
);
/* Do not hangup the call for 40 seconds */
twilioVoiceResponse.pause({ length: 40 });
response.writeHead(200, { "Content-Type": "text/xml" });
/* Send the TwiML twilioVoiceResponse back to Twilio */
/* Example:
<?xml version="1.0" encoding="UTF-8"?>
<Response>
<Start>
<Stream name="VoiceStream from Twilio" url="wss://df2b-39-110-216-51.ngrok-free.app"/>
</Start>
<Say language="ja-JP" voice="Polly.Takumi-Neural">こんにちは。かずはです。何でも聞いてください。</Say>
<Pause length="40"/>
</Response>
*/
log(`Twilio WS: TwiML response sent back: ${twilioVoiceResponse.toString()}`);
response.end(twilioVoiceResponse.toString());
});
/* Start the HTTP server on localhost with port HTTP_SERVER_PORT */
httpServer.listen(HTTP_SERVER_PORT, () => {
log(`Server listening on: http://localhost:${HTTP_SERVER_PORT}`);
});
The code above sets the POST /twiml endpoint. A response has to be sent back to Twilio to provide it with instructions on what to do. In our case, we want to Twilio to:
- start a stream to our websocket (
wss://54de-126-36-198-149.ngrok-free.appin my case). Documentation about Twilio Voice Stream can be found here. - make Twilio say an introductory message to the caller. We specified the language
ja-JPand the used voicePolly.Kazuha-Neural. A list of usable voices for text-to-speech can be found here. - pause the call for 40 seconds. Otherwise, the call would end immediately.
That is it for our HTTP server.
Using Twilio VoiceStream
In the previous step, we provided Twilio with a websocket URL. We will now implement that websocket server.
// server.js

const WebSocketServer = require("websocket").server;
const httpServer = Http.createServer(handleRequest);

/* Setup the websocket server */
const websocketServer = new WebSocketServer({
  httpServer: httpServer,
  autoAcceptConnections: true,
});

websocketServer.on("connect", connection => {
  log("Twilio WS: Connection accepted");
  new VoiceStream(connection);
});
When Twilio connects to websocket server, we will instantiate a VoiceStream object that will manage that connection. Implementation is as follows.
// server.js

/* VoiceStream class that will store the Websocket connection [Twilio] <-> [Websocket server] */
/* This class will handle the media stream from Twilio */
/* It will also handle the transcription from AmiVoice */
class VoiceStream {
  constructor(connection) {
    // processMessage is called when a message is received from Twilio
    connection.on("message", message => {
      this.processMessage(message);
    });

    // close is called when the connection is closed by Twilio
    connection.on("close", () => {
      log("Twilio WS: Connection closed by Twillio");
      this.close();
    });

    this.messageCount = 0;
    this.amiVoiceConnection = null;
    this.callSid = ""; // unique call identifier from Twilio
  }

  /* This function is called when a message is received from Twilio */
  /* The message will be a JSON object */
  /* Reference: https://www.twilio.com/docs/voice/tutorials/consume-real-time-media-stream-using-websockets-python-and-flask */
  processMessage(message) {
    if (message.type === "utf8") {
      const data = JSON.parse(message.utf8Data);
      switch (data.event) {
        case "connected":
          // This event is received when the connection is first established
          // Example: { event: "connected", protocol: "Call", version: "0.2.0" }
          log("Twilio WS: Connected event received: ", data);
          break;
        case "start":
          // This event is received when the stream is started
          // We will store the callSid and create an AmiVoice connection
          // Example: {
          //   event: "start",
          //   sequenceNumber: "1",
          //   start: {
          //     accountSid: "AC0d7016bb1842a6b3e80d1d6d56036784",
          //     streamSid: "MZ639f5aaf9b0c0fe84f01b5e8478c7d52",
          //     callSid: "CAea9962c5d642db0576ffd21fa1b9d6ad",
          //     tracks: [ "inbound" ],
          //     mediaFormat: { encoding: "audio/x-mulaw", sampleRate: 8000, channels: 1 }
          //   },
          //   streamSid: "MZ639f5aaf9b0c0fe84f01b5e8478c7d52"
          // }}
          log("Twilio WS: Start event received: ", data);

          this.callSid = data.start.callSid;
          this.amiVoiceConnection = new AmiVoice(env.AMIVOICE_API_KEY);

          // When the AmiVoice connection receives a transcription, we will process it with ChatGPT and send it back to Twilio
          this.amiVoiceConnection.on("transcription", transcriptionData => {
            this.receivedTranscription(transcriptionData, this.callSid);
          });
          break;
        case "media":
          // This event is received continuously while the stream is active
          // It contains the audio data from Twilio that we will send to AmiVoice
          // Example: {
          //   event: 'media',
          //   sequenceNumber: '256',
          //   media: {
          //     track: 'inbound',
          //     chunk: '255',
          //     timestamp: '5180',
          //     payload: 'fv//fv///37///////////////////////////9+//9+////fv///37/////fv////////////////9+//////////9+////fn7/////////////////////fv////9+//9+/////////////////37//////////37//////////37//////////////////37/////////////fv9+/w=='
          //   },
          //   streamSid: 'MZ1476190b98d7e720c314ecc9cde50b73'
          // }
          this.amiVoiceConnection.send(data.media.payload);
          break;
        case "closed":
          // This event is received when the stream is closed
          // Example: { event: "close", streamSid: "MZ639f5aaf9b0c0fe84f01b5e8478c7d52" }
          log("Twilio WS: Close event received: ", data);
          this.close();
          break;
      }

      this.messageCount++;
    } else if (message.type === "binary") {
      log("Twilio WS: binary message received (not supported)");
    }
  }

  // This function is called when the connection is closed
  // We will close the AmiVoice connection as well
  close() {
    log(
      "Twilio WS: Closed. Received a total of [" +
        this.messageCount +
        "] messages"
    );
    this.amiVoiceConnection.close();
  }

  // This function is called when a transcription is received from AmiVoice
  // We will send the transcription to ChatGPT and send the response back to Twilio via API
  // We can identify the call using the callSid that we stored earlier and pass the ChatGPT response to Twilio
  // Reference: https://www.twilio.com/docs/voice/tutorials/how-to-modify-calls-in-progress/node
  async receivedTranscription(data, callSid) {
    log(`Twilio WS: Received message from AmiVoice: ${data.body.text}`);

    // Send a <Say> message to Twilio that will be read back to the caller
    const completion = await openai.createChatCompletion({
      model: "gpt-3.5-turbo",
      messages: [{ role: "user", content: data.body.text }],
    });

    // Update the call with the <Say> message
    const chatGptMessage = completion.data.choices[0].message.content;
    const twiml = new VoiceResponse();
    twiml.say(
      {
        voice: TWILIO_VOICE,
        language: TWILIO_LANGUAGE,
      },
      chatGptMessage
    );
    twiml.pause({ length: 40 });

    twilioClient
      .calls(callSid)
      .update({ twiml: twiml.toString() })
      .then(_call =>
        log(
          `Twilio WS: ChatGPT response sent back with TwiML: ${chatGptMessage}`
        )
      );
  }
}
Throughout the call, Twilio will send to the websocket server four types of message:
connected: event notifying that Twilio connects to our websocket for the first time.start: event notifying that the stream has started. Useful informations such ascallSid(unique identifier for the call) are provided in the body. We will use thatcallSidlater to send back verbal messages from ChatGPT to the call. Besides, we will setup the connection with AmiVoice websocket API and a callback method for processing transcribed messages received.media: event containing the voice data of the caller. That data will be sent to AmiVoice websocket API for transcription.closed: event notifying the end of the connection. Received when the user hangs up or if an error occured.
Transcribing with AmiVoice WebSockets API
// amivoice.js

/*
  This class will store the connection to the AmiVoice API.
  It will also handle the connection and disconnection of the service.
  It will also handle the sending of audio to the service and the sending of the transcription to the server via EventEmitter.
*/

const EventEmitter = require("events");
const WebSocketClient = require("websocket").client;

const AMIVOICE_WEBSOCKET_URL = "wss://acp-api.amivoice.com/v1/";

class AmiVoice extends EventEmitter {
  constructor(apiKey) {
    super();
    this.apiKey = apiKey;
    this.isReady = false;
    this.connect();
  }

  /* connect() will create a new connection to the AmiVoice API. */
  /* All the listeners are set up here. */
  /* Reference: https://docs.amivoice.com/amivoice-api/manual/user-guide/request/websocket-interface */
  connect() {
    if (!this.isReady) {
      const client = new WebSocketClient();

      client.on("connectFailed", error => {
        log("AmiVoice: " + error.toString());
        this.isReady = false;
      });

      client.on("connect", connection => {
        this.connection = connection;
        log("AmiVoice: websocket client connected");

        connection.on("message", message => {
          if (message.type === "utf8") {
            // code is the first character of the message and is used to determine what the message is
            // Reference: https://docs.amivoice.com/amivoice-api/manual/reference/websocket/packet/packet-state-transition
            // A: recognition processing completed and recognition result accepted
            const code = message.utf8Data.charAt(0);

            switch (code) {
              case "A":
                const data = JSON.parse(message.utf8Data.substring(2));
                log(`AmiVoice: [A] ${data.text}`);
                this.emit("transcription", { body: data });
                break;
            }
          }
        });

        connection.on("close", () => {
          this.isStarted = false;
          log("AmiVoice: connection closed");
        });

        this.isReady = true;
        this.start();
      });

      client.connect(AMIVOICE_WEBSOCKET_URL);
    }
  }

  // send() will send the audio to the AmiVoice API
  // The audio is sent as a base64 encoded string in the payload so it must be decoded first
  // Then the payload is converted to a Uint8Array and the first byte is set to 0x70
  // Then the Uint8Array is converted to a Buffer and sent to the AmiVoice API
  // Reference: https://docs.amivoice.com/amivoice-api/manual/reference/websocket/command/p-command-packet
  // Format: p<audio_data>
  // According to the documentation:
  //   `<audio_data>は、セッション開始時の s コマンドで指定した音声フォーマットの音声データです。
  //   この音声データの先頭に、0x70( 'p' のアスキーコード)を付け、バイナリフレームで送信します。`
  send(payload) {
    if (this.isStarted) {
      const buff = Buffer.from(payload, "base64");

      const outData = new Uint8Array(buff.length + 1);
      outData[0] = 0x70; // "p"
      for (let i = 0; i < buff.length; i++) {
        outData[1 + i] = buff[i];
      }

      this.connection.send(Buffer.from(outData));
    }
  }

  // close() will send the close command to the AmiVoice API
  // Reference: https://docs.amivoice.com/amivoice-api/manual/reference/websocket/command/e-command-packet
  // Format: e
  close() {
    if (this.isStarted && this.isReady) {
      log("AmiVoice: send close command");
      const endCommand = "e";
      this.connection.send(endCommand);
      this.isStarted = false;
    }
  }
}

module.exports = {
  AmiVoice,
};
The AmiVoice class will manage the AmiVoice websocket connection and provide methods for sending data (send()) and receiving the transcribed data (A message inside the connection.on("message") block).
send(payload)function is used for relaying the data from Twilio to AmiVoice and is called inserver.js.- When AmiVoice is done with a transcription task, it will send back to us a message with a code
Aaccompanied with the transcribed text. Upon receiving it, we willemit(we usedEventEmitterlibrary for this) that transcription back to ourVoiceStreamso that we can process it.
I will skip the detailed explanations of the other parts of the code as they are very specific to AmiVoice. More information about AmiVoice (in Japanese) can be found here.
Getting & relaying back ChatGPT answers
Finally, let’s talk to Mr. ChatGPT. We got the transcribed text of the caller voice and will provide ChatGPT with it.
// amivoice.js

case "A":
  const data = JSON.parse(message.utf8Data.substring(2)); // to exclude the A code from the body
  this.emit("transcription", { body: data });
  break;
// server.js

// When the AmiVoice connection receives a transcription, we will process it with ChatGPT and send it back to Twilio
this.amiVoiceConnection.on("transcription", (transcriptionData) => {
  this.receivedTranscription(transcriptionData, this.callSid);
});

...

// This function is called when a transcription is received from AmiVoice
// We will send the transcription to ChatGPT and send the response back to Twilio via API
// We can identify the call using the callSid that we stored earlier and pass the ChatGPT response to Twilio
// Reference: https://www.twilio.com/docs/voice/tutorials/how-to-modify-calls-in-progress/node
async receivedTranscription(data, callSid) {
  log(`Twilio WS: Received message from AmiVoice: ${data.body.text}`);

  // Send a <Say> message to Twilio that will be read back to the caller
  const completion = await openai.createChatCompletion({
    model: "gpt-3.5-turbo",
    messages: [{role: "user", content: data.body.text}],
  });

  // Update the call with the <Say> message
  const chatGptMessage = completion.data.choices[0].message.content;
  const twiml = new VoiceResponse();
  twiml.say({
    voice: TWILIO_VOICE,
    language: TWILIO_LANGUAGE,
  }, chatGptMessage);
  twiml.pause({ length: 40 });

  twilioClient.calls(callSid)
    .update({twiml: twiml.toString()})
    .then(_call => log(`Twilio WS: ChatGPT response sent back with TwiML: ${chatGptMessage}`));
}
The receivedTranscription called upon receiving the transcription is quite compact and straight-forward:
- It will send the transcription to text to ChatGPT using
openailibrary and get back the the answer. - A
VoiceResponsewill be built with the ChatGPT message and other settings such asvoice,language,pauseand update the current call identified by thecallSid. More information here.
Now, the application’s implementation is done. We are now able to call a phone number and talk to ChatGPT 🎉 Here is a demonstration video about the prototype we just built.
Demo
Conclusion
Thank you for reading! With simple libraries and services, we managed to make a pretty awesome AI callbot for talking about anything. Full code with installation instructions can be found here: https://github.com/tonystrawberry/callbot.twilio.amivoice.
Of course, we could have considered other services such as Amazon Connect coupled with Lambda instead of Twilio or Amazon Transcribe instead of AmiVoice API. I chose Twilio over Amazon Connect for this prototype for the simplicity of installation and usage and AmiVoice seems to be better at recognizing and transcribing Japanese speech than Amazon Transcribe.
Feel free to contact me for any questions: https://github.com/tonystrawberry/
Reference: https://cloudapi.kddi-web.com/magazine/twilio-media-stream/twilio-amivoice-speech-recognition-method
Article Photo by Andy Kelly
Author

You may also like
Serverpod for a Weekend - The Good, The Bad, and The Surprising
I've been building Flutter apps professionally for years now, and I've seen the backend landscape evolve from Firebase to Supabase to custom Node.js APIs. Each solution came with trade-offs: Firebase locked you in, Supabase was great until you needed cust...

What I Thought Was People Management Wasn't People Management at All
This article is the 15th entry in the D-Plus🐬 Development Productivity Community Advent Calendar 2025. Day 14's article is... wait, nobody's there??? I had the opportunity to speak at D-Plus in Osaka back in May with a presentation called Task Management...
