In the previous article, we talked about creating custom layouts with Jetpack compose. This article will dive deeper and cover creating a custom modifier with a custom scope.
We created a star layout in the previous article and it looked like this:

You can access the source code from here.
Using the previous implementation, we can place child views on star tips. Now we will extend this functionality to be able to put views inside the star, and we will also be able to slide them along the star arms.
Each child should tell the star layout if it will be inside the star or on a star arm. It must also tell it about its relative position along the star arm. Compose has a ParentDataModifier interface that we can implement to allow each child to provide data to the parent layout, which is the star layout in this case.
private data class StarItemData(
    val slide: Float,
    val onArm: Boolean = true,
    val customAngle: Double = 0.0
) :
    ParentDataModifier {

    override fun Density.modifyParentData(parentData: Any?) = this@StarItemData
}
We created a data class called StarItemData that implements the ParentDataModifier interface. This class has two properties:
-
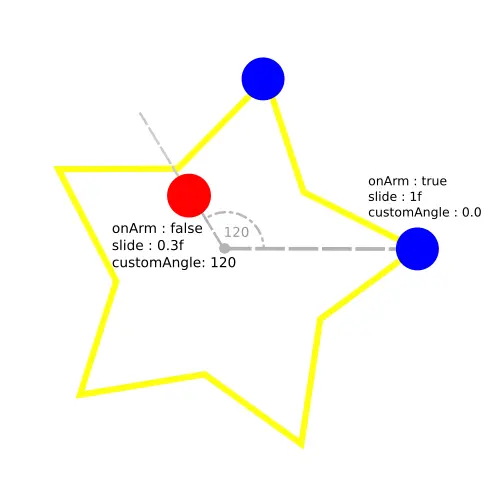
slide: defines the position of the child view along the star arm, use
1fto place the view on the star arm tip and0fat the star's center, you can also use values > 1 to place the view outside the star tip, and values between 0 and 1 to place it along the star tip. -
onArm: used to tell whether there will be a star arm for this view or not. We don’t need to draw a star arm for a view if we want to place it inside the star.
-
customAngle: in degrees, this value will be used with slide value to define the position of the views that are not on a star arm.
Density.modifyParentData function provides parent data for the parent layout. We simply return the instance of StarItemData.
The image below shows how this works :

We want to make the StarItemData available only for views inside the star layout. To achieve that, we will create a custom scope.We can do this in Compose by creating an Interface that contains an extension function on Modifier. Let’s name our interface StarLayoutScope.
interface StarLayoutScope {
    fun Modifier.adjustPlace(slide: Float, onArm: Boolean = true, customAngle: Double = 0.0) =
        this.then(
            StarItemData(slide, onArm, customAngle)
        )

    companion object : StarLayoutScope
}
We will use the adjustPlace function to set the star data for the view. We also create a companion object which is an implementation of the interface, becaue our interface contain only an extension function, there is nothing to override.
Now let's update the old code to implement the new features, let's look at this section from the previous code.
@Composable
fun StarLayout(
   radius: Dp,
   modifier: Modifier = Modifier,
   drawStyle: DrawStyle = Stroke(12f),
   color: Color = Color.Yellow,
   content: @Composable () -> Unit
) {
we will update this line
content: @Composable () -> Unit
to become like this
content: @Composable StarLayoutScope.() -> Unit
We made the type of the content an extention function on StarLayoutScope so we can call adjustPlace function on the modifier, we are basically making the adjustPlace accessiable inside content. Let's also modify
   Layout(
        content = content,
        modifier = modifier
    ) { measurables, constraints ->
to
   Layout(
        content = { StarLayoutScope.content() },
        modifier = modifier
    ) { measurables, constraints ->
Here we call the content() on a concrete implementation of the StarLayoutScope interface, which is the companion object in this case. This is done inside a lambda function.
The position of each child view inside the star layout will depend on its StarItemData, we can get this data for each child view from its corresponding measurable. Let’s store the StarLayoutData for the measurables in a list called itemDataList.
{ measurables, constraints ->
        val placeables = measurables.map { it.measure(constraints) }
        val itemDataList = measurables.map { it.parentData as? StarItemData }
        count = itemDataList.filter { it == null || it.onArm }.size
Views with no StarItemData should follow the default behaviour, which is being positioned on a start arm, also views with value onArm set to true will be drawn on a star arm. That is why we set the value of the count variable to the number of measurables that has onArm set to true instead of the total count of measurables.
Placing child views
We previously used this block of code to place child views inside the star layout
placeables.forEach { placeable ->
    placeable.place(
        totalRadius - placeable.width / 2 + (starRadiusPx * cos(angle)).toInt(),
        totalRadius - placeable.height / 2 + (starRadiusPx * sin(angle)).toInt(),
    )
    angle += step
}
Now we will update to take into account the values provided by StarItemData.
placeables.forEachIndexed { index, placeable ->
    val itemData = itemDataList.getOrNull(index)
    val slideFactor = itemData?.slide ?: 1f
    val customAngle = itemData?.customAngle ?: 0.0
    val onEdge = itemData?.onArm ?: true
    println("index is $index, slide data : $itemData")
    val drawAngle = if (onEdge) angle else Math.toRadians(-customAngle)
    placeable.place(
        totalRadius - placeable.width / 2 + (starRadiusPx * slideFactor * cos(drawAngle)).toInt(),
        totalRadius - placeable.height / 2 + (starRadiusPx * slideFactor * sin(drawAngle)).toInt(),
    )
    if (onEdge) angle += step
}
What we are doing in the new code is using the index of each placeable to get the StarItemData for each child view from the itemDataList we created earlier. If the slide value is set, we store it in slideFactor variable. Otherwise, we set it to 1f.
We also set the value of onArm variable to be equal to the value set on the StarItemData. If no value is set, we set it to true.
We will also need the angle value if the onArm value is set to false. The angle value will help us define the position of the view. drawAngle will hold the angle value for each view. Suppose the onArm value for the view is true. In that case, we assign the value of the gradually increased angle to drawAngle. If its value is false, we assign the customAngle value provided to the drawAngle. The negative sign is to make the angle go counterclockwise.
Then we calculate the x and y position for each view. We also increase the angle value by the amount of step, which depends on the count of views that will be drawn on star arms. You can refer to the previous article for more details about the positioning process.
We modify the logic for placing each view, taking into account the slide factor. We also increase the angle only when the value of onArm is true because the count of items distributed shouldn't be affected by views that are not on the star arms.
Now lets test our new star layout, in the main activity modify the code to look like this :
setContent {
    Star_layout_articleTheme {
        // A surface container using the 'background' color from the theme

         Column(
                    horizontalAlignment = Alignment.CenterHorizontally
        ) {

            StarLayout(radius = 160.dp) {
                items.forEach {

                    StarItem(
                        selected = it,
                        radius = 42.dp,
                        modifier = Modifier.adjustPlace(0.9f)
                    ) {}
                }
                StarItem(
                    selected = false,
                    radius = 42.dp,
                    modifier = Modifier.adjustPlace(0.3f, false, 120.0)
                ) {}
                StarItem(
                    selected = false,
                    radius = 42.dp,
                    modifier = Modifier.adjustPlace(0f, false)
                ) {

                }
            }
        }
    }
}
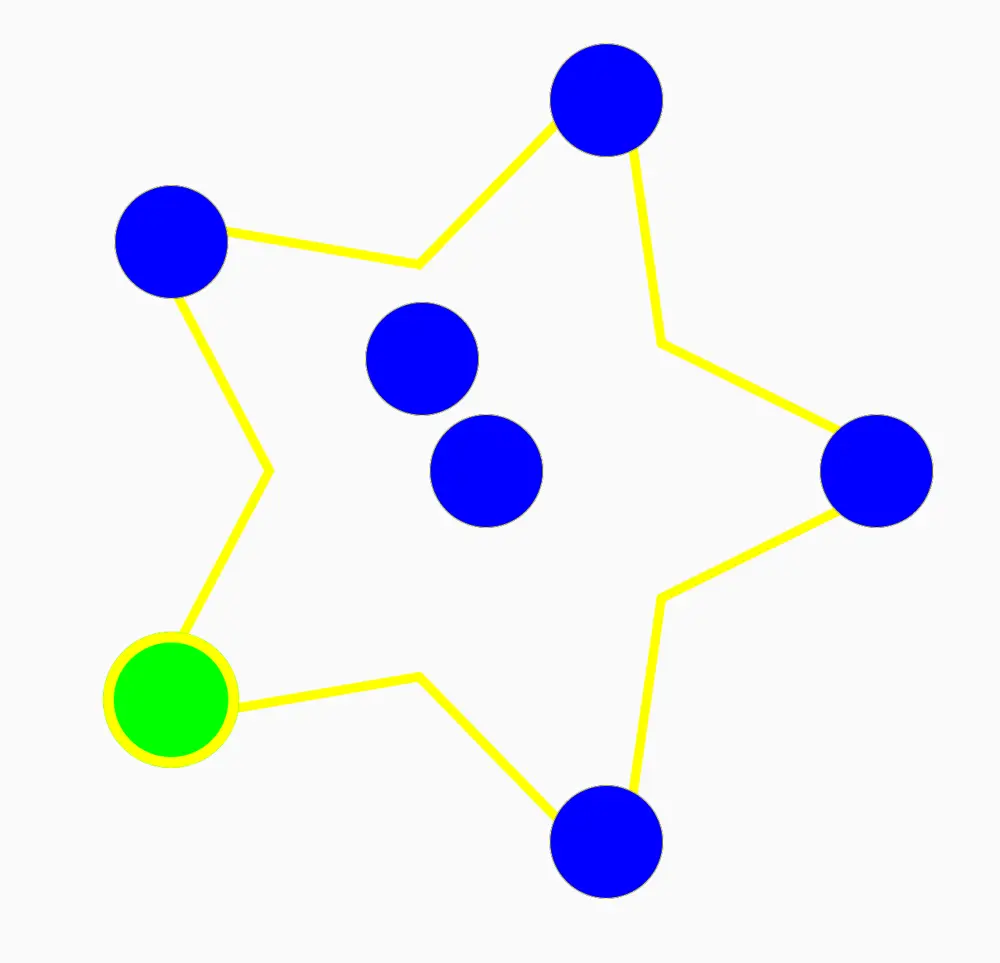
the result should look something like this

As you see, we still have five items on star tips, but a bit slid towards the star's center. You can play with the slide value and see the results. We also have two items inside the star. The first one is at the center of the star because we set the slide to be 0f and the onArm to false.
                StarItem(
                    selected = false,
                    radius = 42.dp,
                    modifier = Modifier.adjustPlace(0f, false)
                ) {

                }
The second one is a bit far from the center and at an angle of 120 degrees; this is because we provided a 0.3f slide and a 120 custom degree.
               StarItem(
                    selected = false,
                    radius = 42.dp,
                    modifier = Modifier.adjustPlace(0.3f, false, 120.0)
                ) {}
A cool idea would be having pictures of people or objects distributed on the star arms, and when selecting one of them a small description appears inside the star, we can also animate the slide value to get cool enter/exist animation.
Source code can be found here on the "custom_modifier" branch.
References :
https://fvilarino.medium.com/creating-a-custom-modifier-attribute-on-jetpack-compose-f100c6bcb987
Author

Kamel Mohamad
Android developer


