WWDC this year brought to light a lot of amazing features Apple has been working on lately. One of these features, and maybe one of the most expected, was Dark Mode support.
As Apple mentioned in their keynote, Dark Mode is easy to implement and will bring a whole new look to your application.
Though easy to implement, support for Dark Mode doesn't come for free. In this post we will look at what is needed from us, the developers, to join the dark side.
Before we dive into specifics about Dark Mode implementation, let us look at Apples Human Interface Guidelines and see what they say about Dark Mode.
The main rules to follow presented in Apple's guidelines are the following:
- Focus on your content.
- Test your design in both light and dark appearances.
- Ensure that your content remains comfortably legible in Dark Mode when you adjust the contrast and transparency accessibility settings.
Semantic Colors
To support Dark Mode the main thing we have to consider in our iOS applications is the way we handle and implement colors. Traditionally each piece of our UI would have a color - created by providing a single RGB value - assigned, but in order to implement the dark appearance for our UI, we will need to change this approach and instead start using what is referred to as "Semantic Colors".
Making a color semantic simply means that instead of referring to the color directly (red, blue, yellow), we refer to the color by the role is has (background, text, important). This means that we shouldn't directly assign RGB colors to our views, but instead create the colors in a separate part of our application before we assign them. For example you will declare and assign a primary background color in a similar fashion.
// create an UIColor extension to declare our colors
extension UIColor {
	static let primaryBackgroundColor = UIColor.black
}
// assign the primaryBackgroundColor to our backgroundView in our UIViewController or UIView
backgroundView.backgroundColor = .primaryBackgroundColor
Semantic colors have more benefits than just support for Dark Mode, they will also empower you to easily manage your colors.
In Xcode 11 Apple has provided us with several semantic colors. For example UIColor.systemBackground will be white for a light appearance and dark for a dark appearance.
We can also create our own custom colors. To do so we need to navigate to our Assets catalog (Assets.xcassets) and add a New Color Set. Now that we have created a new color, we need to select the Attribute inspector in the top right corner and select values Any, Dark for our color Appearances.
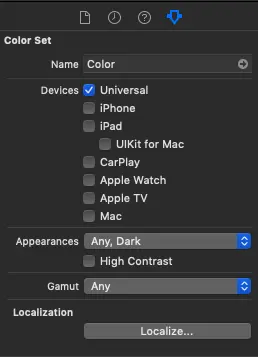
When a color has multiple appearance values, we call the color "Dynamic Color".
Design Levels
For dark appearance support Apple has introduced a two level design. This contains:
- base level: which is used when the view fills the whole screen
- elevated level: which is used when the view is in a separate layer above the base
To identify the level of the view, you can access the UITraitCollection.userInterfaceLevel value associated with the view.
This will allow you to create a more stylished UI by providing different values for the same color, depending on the userInterfaceLevel.
Dynamic Colors
To obtain the final color, dynamic colors get resolved using a UITraitCollection. For system defined colors this happens automatically, but, we can also declare our own dynamic colors programatically! "How?" you might wonder. Well lets see together.
I suggest that you create your own colors in an extension to UIColor. This will allow you to easily access your colors whenever a UIColor is needed, by reducing the need to call UIColor.myColor and instead just provide the color .myColor.
Now lets look at what it takes to create our own custom dynamic color.
import UIKit

extension UIColor {

    // create a dynamic color to use as a background color in our application
    static let dynamicBackgroundColor = UIColor { (traitCollection: UITraitCollection) -> UIColor in
    	 // resolve the color by using traitCollection
        switch traitCollection.userInterfaceStyle {
        case .dark:
            return .black
        case .light, .unspecified:
            return .white
        @unknown default: // may have additional userInterfaceStyles in the future
            return .white
        }
    }

}
This will allow you to assign your background color to your view with the following code view.backgroundColor = .dynamicBackgroundColor. As you can see nothing changed in the way we assign color, but how does it know to return the proper color if no UITraitCollection is specified? This is handled in the background by UIKit and it uses the newly introduced UITraitCollection.current.
Resolving Dynamic Colors
UIKit sets the current UITraitCollection for the view during the draw() method. As well, when the appearance changes, UIKit will automatically call setNeedsDisplay on your view, which will cause the view to be redrawn with the proper UITraitCollection value.
It is important to note that the value associated with UITraitCollection.current is not guaranteed to be correct if called outside of the following functions, in which UIKit sets the value for the UITraitCollection.
-
UIView
draw()layoutSubviews()traitCollectionDidChange()tintColorDidChange()
-
UIViewController
viewWillLayoutSubviews()viewDidLayoutSubviews()traitCollectionDidChange()
-
UIPresentationController
containerViewWillLayoutSubviews()containerViewDidLayoutSubviews()traitCollectionDidChange()
To use dynamic colors outside of these methods you might need to manage the UITratCollection. This is needed when working with lower level classes such as CALayer, CGColor etc.
Lets see below how we can use dynamic colors when assigning a borderColor property to our view's CALayer.
  let layer = CALayer()
  // get the current traitCollection used for our view
  let traitCollection = view.traitCollection
  traitCollection.performAsCurrent {
  	   // assign a dynamic borderColor called borderColor
      layer.borderColor = UIColor.borderColor.cgColor
  }
When performAsCurrent is called on a traitCollection it makes the traitCollection become the current traitCollection whereafter it runs the code inside the closure. This means that our borderColor is resolved accordingly.
Now that we have resolved our dynamic colors when creating our views, we need to be aware that there can be times when we will need to resolve the dynamic colors again. This usually happens when the current traitCollection changes. To listen to traitCollection changes we can override override func traitCollectionDidChange(_ previousTraitCollection: UITraitCollection?) in both our UIView's and UIViewController's. Though when overriding this function we should be aware that not all traitCollection changes will mean that we need to resolve our colors again. This will only be needed when the user interface appearance changes. We can check if the change is a change in apparance by using calling traitCollection.hasDifferentColorAppearance(comparedTo: previousTraitCollection).
  override func traitCollectionDidChange(_ previousTraitCollection: UITraitCollection?) {
        super.traitCollectionDidChange(previousTraitCollection)

        guard traitCollection.hasDifferentColorAppearance(comparedTo: previousTraitCollection) else { return }

        // Resolve Dynamic Colors here
    }
Resolving Dynamic Images
So far we have discovered the concept of "Dynamic Colors". Similarly an UIImage can become a "Dynamic Image".
Dynamic Images are automatically resolved by UIImageView but if we need to resolve our UIImage independently we can do so by accessing the imageAsset property on our UIImage.
let image = UIImage(named: "nodesLogoImage")
let asset = image?.imageAsset
// get the appropriate image by resolving the dynamic image
let resolvedImage = asset?.image(with: traitCollection)
Final notes
Trait Collections play an important role when implementing Dark Mode. One important thing worth remembering is that there isn't a single app wide traitCollection value but instead they cascade through the app's hierarchy.
Supporting Dark Mode for your application will definitely make your users happy, and as we saw above, it is not a really complex task to do so. Just remember to pay attention when creating and assigning your dynamic colors.
Hope to see you next time!
References:
Cover Photo by Lubo Minar on Unsplash.
Author

You may also like
Serverpod for a Weekend - The Good, The Bad, and The Surprising
I've been building Flutter apps professionally for years now, and I've seen the backend landscape evolve from Firebase to Supabase to custom Node.js APIs. Each solution came with trade-offs: Firebase locked you in, Supabase was great until you needed cust...

What I Thought Was People Management Wasn't People Management at All
This article is the 15th entry in the D-Plus🐬 Development Productivity Community Advent Calendar 2025. Day 14's article is... wait, nobody's there??? I had the opportunity to speak at D-Plus in Osaka back in May with a presentation called Task Management...
