With the release of Swift 3.0, Apple introduced the Swift Package Manager, a tool for managing the distribution of Swift code. It is integrated with the Swift build system to automate the process of downloading, compiling, and linking dependencies.
Though in the beginning, Swift Package Manager didn’t easily support packages for iOS, watchOS, or tvOS, this year, at WWDC 2019, Apple announced that Swift Package Manager is now an integrated part of Xcode and will be available for iOS projects.
Now that Swift Package Manger is supported for iOS, we will see an increased adoption of it for the 3rd party iOS frameworks we use daily, so let us examine how we can add a package to our project using Swift Package Manager and also, how we can distribute our own packages using Swift Package Manager.
This two part series will focus on using Swift Package Manager (referenced as SPM) in a client side application and creating your own Swift Package.
Add Packages to Your iOS Application
Since SPM comes integrated in the Swift build system, if you have Xcode on your machine, and most likely you do, you already have everything you need to get started.
With the release of Xcode 11 SPM is an integrated part of Xcode, so in order to continue you will require to have this - at the time of the article, beta - version installed on your machine.
For this example we will integrate a small framework we have developed here at Nodes into an new Xcode project. The framework is called Rye and can be downloaded here.
To get started we are going to create a new Xcode projected, called SwiftPackageIntegrationDemo.
After you have created the project, integrating an existing Swift Package becomes a trivial thing.
To add a package navigate to File -> Swift Packages -> Add Package Dependency .
Once you have selected Add Package Dependency, you will be presented with a window where you can either selected to add a package from your Github account or add a package via a package repository URL.
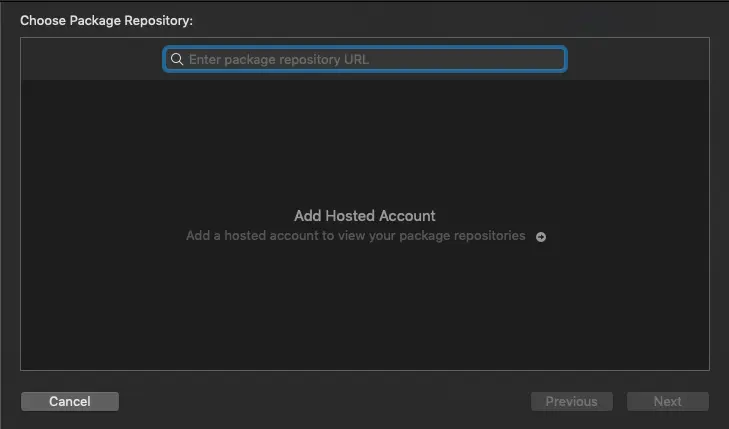
Go ahead and paste https://github.com/nodes-ios/Rye into the search field and press next.
Xcode will verify the package and present you with a window that will allow you to set a series of rules, that will define how this package will update.
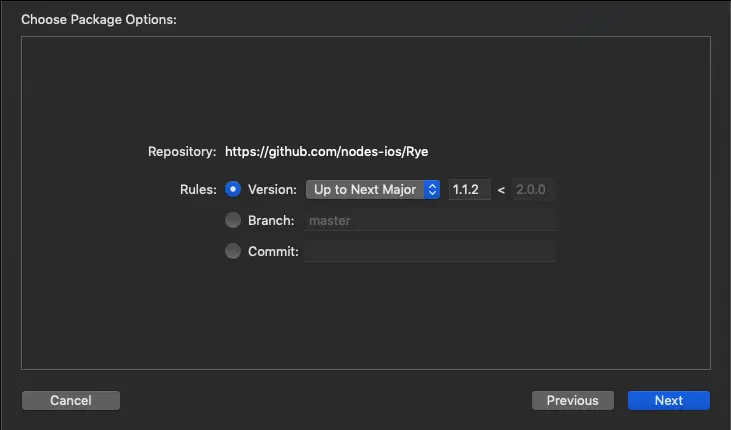
Since Swift Packages should adhere to the semantic versioning rules[“https://semver.org/”], you can define what type of versions you want to update too.
The options will be:
Up to Next Major -> since the current version of our Rye package is 1.1.2, this means we will allow Xcode to update our package with every version released until the next major version 2.0.0.
Up to Next Minor -> selecting this will allow Xcode to update our package with every bug fix version released until the next minor version 1.2.0.
Range -> allows you to specify a custom range of versions
Exact -> will only support the exact package version, in our case, 1.1.2
After you have decided on the appropriate versioning rules, go ahead and click next. Xcode will resolve the package and you will be automatically able to use it in your project.
Go ahead and test this by editing your ViewController.swift to contain the following code:
import UIKit
import Rye

class ViewController: UIViewController {

    override func viewDidLoad() {
        super.viewDidLoad()

        let ryeConfiguration: RyeConfiguration = [Rye.Configuration.Key.text: "Message for the user"]

        DispatchQueue.main.asyncAfter(deadline: .now() + 0.5) {
            let rye = RyeViewController.init(alertType: .toast,
                                            viewType: .standard(configuration: ryeConfiguration),
                                            at: .bottom(inset: 16),
                                            timeAlive: 2)
                                            rye.show()
        }
    }

}
Build and Run the project and voila, you will see an instance of your Rye message created.
Final notes
In this post we saw how Swift Package Manager makes it easy to manage your dependencies, allowing you to focus more on developing the core functionality of your application.
In Part 2 of our series, Create Your Own Swift Package, we will see how you can create your own Swift Package or adopt Swift Package Manager for your existing framework.
Hope to see you next time!
Author

You may also like
RAG: From Concepts to a Bedrock + OpenSearch Serverless Build
Large Language Models are extraordinary generalists, but they fail predictably in two cases: when asked about information they have not seen during training, and when that information has changed since their cut-off date. Fine-tuning, the practice of furt...

Serverpod for a Weekend - The Good, The Bad, and The Surprising
I've been building Flutter apps professionally for years now, and I've seen the backend landscape evolve from Firebase to Supabase to custom Node.js APIs. Each solution came with trade-offs: Firebase locked you in, Supabase was great until you needed cust...
